
Installing flush-mounted boxes – a beginner’s guide
Many people are reluctant to get down to work when it comes to installing flush-mounted boxes. But it’s not that difficult – we’ll show you how!
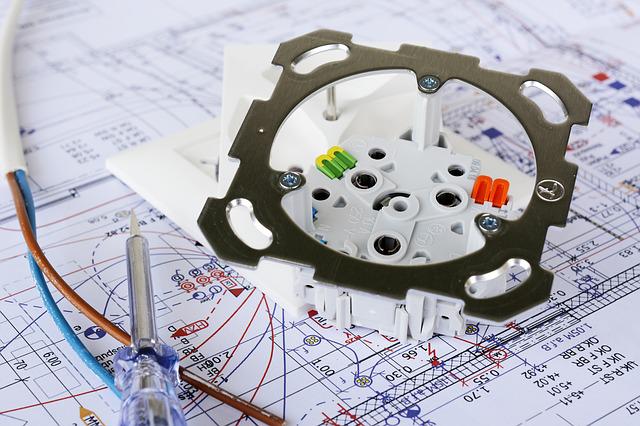
What exactly is a back box?
The flush-mounted box is an important element in the installation of electrical appliances. The box serves as a connection point for the wiring and is designed so that it can be built into the wall. It is therefore particularly important for the installation of switches and sockets. The flush-mounted box is also used for the installation of switches and lights.
But the flush-mounted box is also a switching point that is built into the wall and serves as a connection point for electrical cables. It can be used to connect electrical and telephone cables and offers a safe and orderly way to connect electrical appliances to the power supply.
It’s all about preparation: the right tools and materials
Before you start installing the back boxes, you must first get the necessary tools and materials. In addition to a drill and a suitable drill bit, this includes a plastering trowel as well as fine sandpaper and abrasive fleece. Even if you install the flush-mounted boxes yourself, it is advisable to seek professional advice beforehand. This will ensure that everything is done correctly.
The drilling in the wall must be precise so that the back box can be inserted properly. Before you start drilling, you should therefore mark a hole in the wall. You can use a pencil or a biro for this purpose. Make sure that the hole is neither too large nor too small. Ideally, it should have a diameter of about 3 cm.
After marking the hole, you can start drilling. Drill the hole carefully and slowly so as not to damage the wall. When the hole is large enough, carefully insert the back box into the opening and press it lightly into place. Finally, plaster, glue or screw the box in place and check once again that everything is secure.
Good plastering warning covers help to find the box if the wall is still being plastered.
Tips and tricks: how to install successfully?
For many do-it-yourselfers, installing flush-mounted boxes is a big challenge. Beginners in particular are often overwhelmed and fail. However, it is not so difficult if you follow a few tips and tricks.
1. Choosing the right flush-mounted box
Before you start installing the back box, you should first consider the size and design of the box. Depending on the type of appliance you want to fit in the box, you may need a larger or smaller box.
2.Finding the right position
Before you start drilling, you need to think about where you want to install the back box. It is best to take some time and mark the position of the box on the wall with a pencil. Caution: do not drill into the wall above or next to electrical outlets, as you may run into an electrical cable.
3.Drilling the hole
Before you start drilling, you need to think about the size of the hole. Depending on the size of the box, you may need a larger or smaller hole. Also make sure that the hole is as straight as possible. If the hole is not straight, the flush-mounted box may not fit properly later or may even slip out.
4.Inserting the back box
Once the hole has been drilled, you can insert the back box. The box must first be carefully inserted into the hole and then firmly cleaned.